Git 是日常工作中使用频率极高的工具,各种指令让人眼花缭乱,本文总结一下它的一些常用指令。
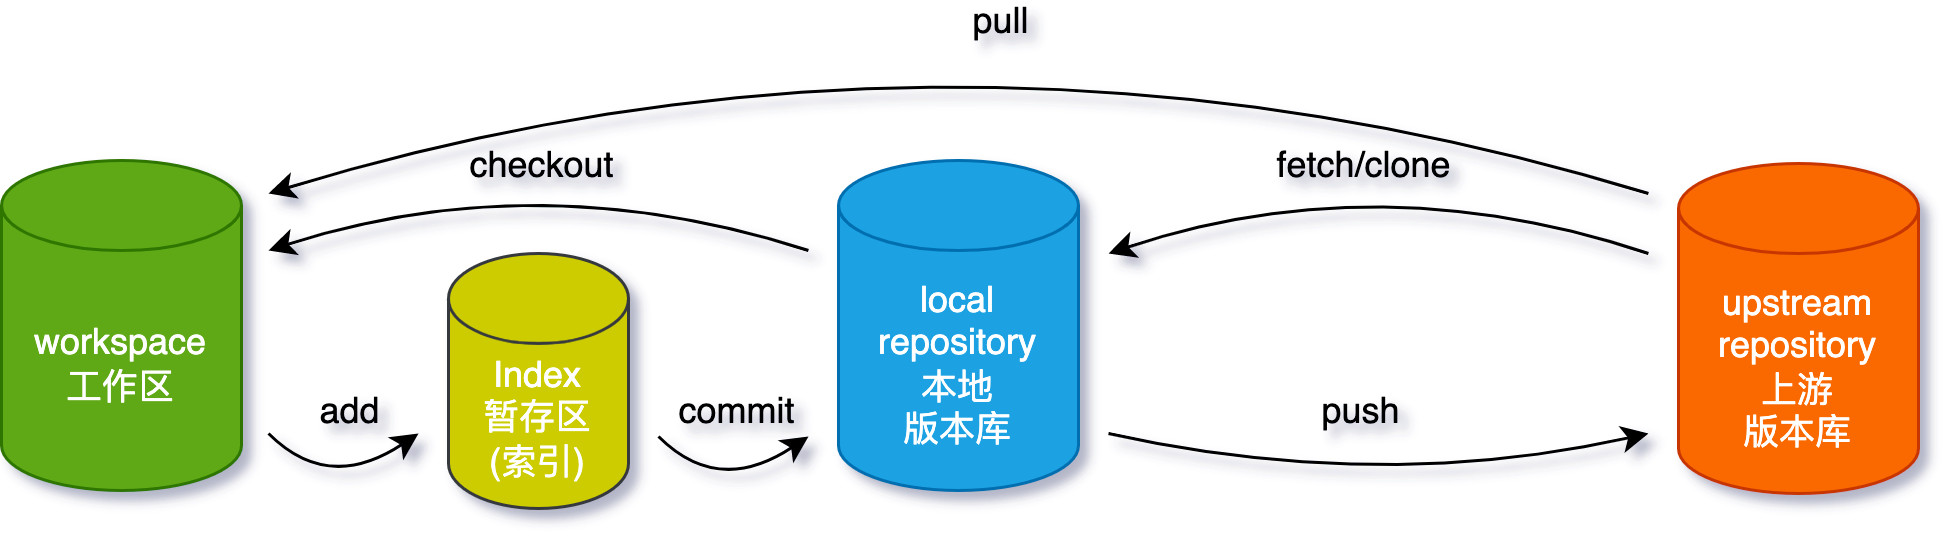
 git 区域
- stash 存档库
- workspace 工作区
- index :暂存区(索引) staging area
- local repository:本地版本库 or 本地仓库
- upstream repository:上游版本库 or 远程仓库
配置工具 config
1
2
3
4
5
|
# 对你的 commit 操作设置关联的用户名与邮箱地址
git config --global user.name "ethan wang"
git config --global user.email "ynthm.w@gmail.com"
# 启用有帮助的彩色命令行输出
git config --global color.ui auto
|
分支 branch
分支是使用 Git 工作的一个重要部分。你做的任何提交都会发生在当前“checked out”到的分支上。使用 git status 查看那是哪个分支。
 1
 2
 3
 4
 5
 6
 7
 8
 9
10
11
12
13
14
15
16
17
18
|
#查看本地分支
git branch
#查看远程分支
git branch -r
# 查看本地和远程分支
git branch -a

# 新建一个分支并且立即切换过去
git checkout -b <name of new branch>

# 删除远程分支
git push origin --delete feature/user_v1.0.1

# 删除本地分支
git branch -d [branch-name] # 会在删除前检查merge状态(其与上游分支或者与head)。
git branch -D [branch-name] # 是git branch --delete --force的简写,它会直接删除。

# 要想本地和远程都删除,必须得运行两个命令
|
进行更改
1
2
3
4
5
6
7
8
|
# 浏览并检查项目文件的发展
git log
# 输出指定commit的元数据和内容变化
git show [commit]
# 将文件进行快照处理用于版本控制
git add [file]
# 将文件快照永久地记录在版本历史中
git commit -m "[descriptive message]"
|
重做提交
1
2
3
4
|
# 撤销所有 [commit] 后的的提交,在本地保存更改
git reset [commit]
# 放弃所有历史,改回指定提交。
git reset --hard [commit]
|
创建仓库
1
2
3
4
5
|
git init
# 在使用过 git init 命令后,使用以下命令将本地仓库与一个 GitHub 上的空仓库连接起来
git remote add origin [url]
# Clone(下载)一个已存在于 GitHub 上的仓库,包括所有的文件、分支和提交(commits)
git clone [url]
|
.gitignore 文件
有时一些文件最好不要用 Git 跟踪。这通常在名为 .gitignore 的特殊文件中完成。你可以在 github.com/github/gitignore 找到有用的 .gitignore 文件模板。
同步更改
 1
 2
 3
 4
 5
 6
 7
 8
 9
10
11
12
13
|
# 下载远端跟踪分支的所有历史
git fetch
# 将远端跟踪分支合并到当前本地分支
git merge
git checkout dev
git merge --no-ff feature/new_feat
# 将所有本地分支提交上传到远程仓库
git push
# 使用来自上游仓库的对应远端分支的所有新提交更新你当前的本地工作分支。git pull 是 git fetch 和 git merge 的结合
git pull

# 把某个提交移动到当前分支来
git cherry-pick <commit>
|
git pull
1
2
3
4
5
6
7
|
# git pull = git fetch + git merge
# 将远程主机 origin 的 master 分支拉取过来,与本地的 brantest 分支合并。
git pull origin master:brantest
# 如果远程分支是与当前分支合并,则冒号后面的部分可以省略。
git pull origin master

git remote prune origin
|
remote
1
2
3
4
5
6
7
8
|
# 默认 remote 为 origin
git remote
# 查看远程仓库的数量
git remote -v
# 查看某个远程仓库的具体信息,以origin为例:
git remote show origin
# remote分支已经删除了,但本地还显示。
git remote prune origin
|
git push
1
2
3
4
5
6
|
# 从本地提交推送分支改变到远程,分支为所有推送过的分支
git push
# 向远端版本库推送新的(已存在的)分支
git push <remote> <branch>
# 向远端版本库推送分支,但是从不同的(本地)分支名
git push <remote> <branch>:<branch>
|
git push 是 git push origin master 的一种简写形式。不特定指出“远程仓库名和分支名”,一般是使用默认配置,配置文件(.git/config)相关内容为:
1
2
3
4
5
6
|
[remote "origin"]
  url = git@github.com:ynthm/tiny-webs.git
  fetch = +refs/heads/*:refs/remotes/origin/*
[branch "main"]
  remote = origin
  merge = refs/heads/main
|
- 当你处于 master branch, 默认的 remote 就是 origin。
- 当你在master branch上使用 git pull 时,没有指定remote和branch,那么git就会采用默认的remote(也就是origin)来merge在master branch上所有的改变。
或者用 config 配置
1
2
|
git config branch.master.remote origin
git config branch.master.merge refs/heads/master
|
- 当只关联一个远程,只有一个分支时,这两个命令没什么区别。
- 当你关联了两个多个仓库、有多个分支时,git push 可能会报错,因为它不知道要上传代码到哪里去;
1
2
3
|
# 关联两个仓库: github 和码云
git remote add origin github-url
git remote add gitee gitee-url
|
diff
1
2
3
4
5
6
|
# 显示未添加到暂存区的不同
git diff
# 查看工作区与某一提交之间的不同。你也可以使用 HEAD 来对比上一提交,或是用分支名来和分支比较
git diff <commit or branch>
# 查看已经暂存的内容和上次提交的区别,也可指定某一提交
git diff --cached [<commit>]
|
commit
1
2
3
4
|
# 暂存区中的当前内容连同提交信息储存为新提交
git commit [-m 'msg']
# 用当前暂存去的内容修改最近一次的提交,也可以拿来修改提交信息
git commit --amend
|
tag
 1
 2
 3
 4
 5
 6
 7
 8
 9
10
11
12
13
14
15
|
# tag 列表
git tag
git tag -l # 查看标签
# 删除远程仓库标签
git push origin --delete 1.0.0
# 创建标签
git tag 1.0.0
# 推送到远程仓库
git push origin 1.0.0

git tag -a <tagname> -m "added description release notes" # 创建标签
git tag -d <tagname> # 删除本地标签
git push origin <tagname> # 推送一个本地标签到远程仓库
git push origin --tags # 推送全部未推送过的本地标签
git push origin :refs/tags/<tagname> # 删除一个远程标签
|
clean
 1
 2
 3
 4
 5
 6
 7
 8
 9
10
|
# 删除 untracked 文件
git clean -f
# 连 untracked 的目录也一起删掉
git clean -fd
# 连 gitignore 的 untrack 文件/目录也一起删掉 (慎用,一般这个是用来删掉编译出来的 .o之类的文件用的)
git clean -xfd
#在用上述 git clean 前,墙裂建议加上 -n 参数来先看看会删掉哪些文件,防止重要文件被误删
git clean -nxfd
git clean -nf
git clean -nfd
|
stash
 1
 2
 3
 4
 5
 6
 7
 8
 9
10
11
12
13
14
15
|
# 保存当前修改到新的存档库,并且执行 git reset ‑‑hard 来回滚. message 是可选的来描述存档。想快速建立存档,省略掉 push 和 message.
git stash [push] [-m <message>]
# 应用最后一个(或指定的)存档中的改动,然后从存档库丢弃它
git stash pop
# 从某个存档中将改变应用到工作区,默认是最近的存档
git stash apply [<stash>]
# 显示当前你有的所有存档
git stash list
# 显示存档中记录的改动,对比存档生成时的原来状态;不指定stash则显示最后一个
git stash show [<stash>]
# 从存储区中删除单个存档;不指定stash则删除最后一个
git stash drop [<stash>]

# 清空存档库。注意相关存档会被清理,此操作 **不能被恢复**
git stash clear
|
Git Flow 代码示例
开始新 Feature 开发
1
2
3
4
5
6
7
8
9
|
# -b 依据 dev 创建一个新分支
git checkout -b feature/mes_new_feat dev
# 可选,如果要与其他人合作开发, 推送分支到 origin
git push -u origin feature/mes_new_feat

# 查看状态
git status
git add .
git commit -m "feat: 短信接口"
|
完成 Feature
 1
 2
 3
 4
 5
 6
 7
 8
 9
10
|
git checkout dev
git merge --no-ff feature/mes_new_feat
git push origin dev


# 如果确定分支无用,删除本地
git branch -d feature/mes_new_feat

# 如果推送分支到 origin,删除命令
git push origin --delete feature/mes_new_feat
|
开始 Release
1
2
3
4
|
git checkout -b release/0.1.0 dev

# Optional: Bump version number, commit
# Prepare release, commit
|
完成 Release
 1
 2
 3
 4
 5
 6
 7
 8
 9
10
11
12
13
14
15
16
17
18
19
|
# 将 release/0.1.0 合并到 master
git checkout master
git merge --no-ff release/0.1.0
git push
# 将 release/0.1.0 合并到 dev
git checkout dev
git merge --no-ff release/0.1.0
git push


# 删除 release/0.1.0 分支
git branch -d release/0.1.0

# If you pushed branch to origin:
git push origin --delete release/0.1.0

# 打 tag
git tag -a v0.1.0 master
git push --tags
|
开始 Hotfix
1
2
|
# 从 master 拉出新的 hotfix 分支
git checkout -b hotfix/0.1.1 master
|
完成 Hotfix
 1
 2
 3
 4
 5
 6
 7
 8
 9
10
11
12
|
git checkout master
git merge --no-ff hotfix/0.1.1
git push

git checkout develop
git merge --no-ff hotfix/0.1.1
git push

git branch -d hotfix/0.1.1

git tag -a v0.1.1 master
git push --tags
|
附录